Implementing Simple Classification using a Neural Network in Ruby
In this blog post I will show how to use neural networks in Ruby to solve a simple classification problem. We will be using the RubyGem ruby-fann to help us setup a network, train and make predictions in a matter of minutes. For our dataset we will be using school admission data, this was also the dataset used for in our Implementing Classification using Logistic Regression in Ruby article so we will be able to compare the results and determine if Neural Networks or Logistic Regression is better at solving this problem.
You can find the full sample code used in this blog post here.
Data
The school admission data we are using have 3 rows for each example:
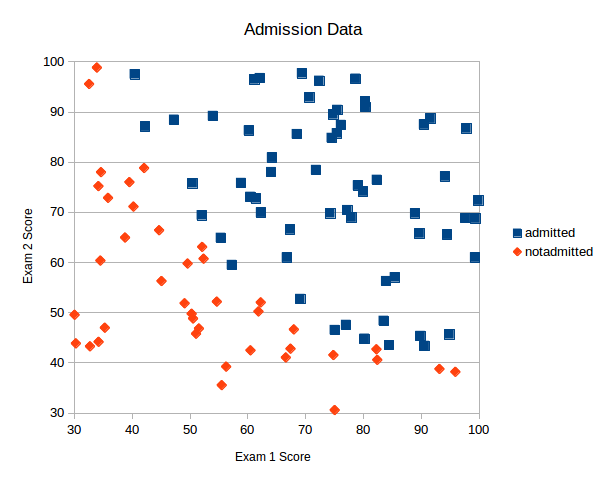
- Result of exam 1 (between 0 and 100)
- Result of exam 2 (between 0 and 100)
- Admission (1 for admitted, 0 if not admitted)
Plotting this data we see that there is clearly an correlation between the results of the exams and admission so we should be able to solve this problem using this data and a neural network.
Neural Network Architecture
Before we start implementing our Neural Network we should determine the architecture of the network we want to build. We will be building a 3 layer network, using our rule of thumbs for neural network creation I suggest we have the following layers:
- Input Layer: 2 nodes (exam 1 score and exam 2 score)
- Hidden Layer 1: 6 hidden nodes
- Output Layer: 1 node
- Since the output of a network is not binary we will be using rounding for classification: if output is <0.5 we classify as not admitted and if the output is >= 0.5 we will classify as admitted
Note that defining the Neural Network architecture is not an exact science. We may later want to vary the number of nodes in our hidden layer later to see if that changes the performance of the network.
Setting up a Neural Network in Ruby
At this point we are ready to implement our neural network in ruby. To get started we install the ruby called ruby-fann. Ruby-fann is a gem that contains bindings to FANN (Fast Artificial Neural Network). FANN is a is a free open source neural network library, which implements multilayer artificial neural networks with support for both fully connected and sparsely connected networks.
To install the gem add it to your gemfile and run bundler or run the following in your terminal:
gem install ruby-fann
Next open an empty file and start by requiring the ruby-fann library and the CSV library which we will be using to load data.
require 'csv'
require 'ruby-fann'
Next we will load our data from our CSV file into an array for our independent variables (exam 1 score and exam 2 score) called x_data, and one for the dependent variable (admission) y_data.
The exam score values are given as floats and the admission value is given as a binary value – 1 for admitted and 0 for not admitted. Note that we put the admission score into an array before adding it to y_data. This effectively makes y_data a two dimensional array. This structure is needed because FANN need the desired values for our output nodes in an array as this enables Neural Networks with multiple output nodes.
x_data = []
y_data = []
# Load data from CSV file into two arrays - one for independent variables X and one for the dependent variable Y
CSV.foreach("./data/admission.csv", :headers => false) do |row|
  x_data.push( [row[0].to_f, row[1].to_f] )
  y_data.push( [row[2].to_i] )
end
Before we setup and train our Neural Network we need to divide the data into training data and testing data. This helps us ensure that the model we will train is not going to be over-fitted to our data. For this example we have allocated 20% of data for testing and 80% for training. We split the data like this:
# Divide data into a training set and test set
test_size_percentange = 20.0 # 20.0%
test_set_size = x_data.size * (test_size_percentange/100.to_f)

test_x_data = x_data[0 .. (test_set_size-1)]
test_y_data = y_data[0 .. (test_set_size-1)]

training_x_data = x_data[test_set_size .. x_data.size]
training_y_data = y_data[test_set_size .. y_data.size]
With our data ready to go we can setup our training data model. Ruby-fann requires our training data to be loaded into a TrainData class like this:
# Setup training data model
train = RubyFann::TrainData.new( :inputs=> training_x_data, :desired_outputs=>training_y_data );
Note that the desired outputs must be a two-dimensional array even if you only have one output node. This is required in order to support networks with multiple output nodes.
Next we can setup our Neural Network model with the architecture defined earlier. We set it up with 2 input nodes, 1 hidden layer with 6 nodes and 1 output node like this:
# Setup model and train using training data
model = RubyFann::Standard.new(
              num_inputs: 2,
              hidden_neurons: [6],
              num_outputs: 1 );
With the model setup we can train it on our training data model defined earlier. We train the model for a maximum of 5000 epochs, for every 500 epochs we ask FANN to output our error and allow the training process to stop if the error drops below 0.01.
# 5000 max_epochs, 500 errors between reports and 0.01 desired mean-squared-error
model.train_on_data(train, 5000, 500, 0.01)
Outputting the error during training is a great diagnostic tool. The error should keep decreasing as we train the model. If the error does not decrease we need to stop and reevaluate our network architecture, as something is keeping the network from creating a good generalized solution for our data.
With our model trained we can start running predictions – in this example we try to predict whether a student with a exam 1 score 45 and an exam 2 score 85 will get admitted:
# Predict single class
prediction = model.run( [45, 85] )
# Round the output to get the prediction
puts "Algorithm predicted class: #{prediction.map{ |e| e.round }}"
Running the prediction is a simple as executing model.run with our data. However to make the actual prediction we will need to round the output nodes as described in our network architecture section.
To determine the accuracy of our model we run a prediction on all of our test data one-by-one, and then compare it with the actual admission data like this:
predicted = []
test_x_data.each do |params|
  predicted.push( model.run(params).map{ |e| e.round } )
end

correct = predicted.collect.with_index { |e,i| (e == test_y_data[i]) ? 1 : 0 }.inject{ |sum,e| sum+e }

puts "Accuracy: #{((correct.to_f / test_set_size) * 100).round(2)}% - test set of size #{test_size_percentange}%"
Running the ruby file in our terminal gives us an output this like:
$ ruby nn.rb
Max epochs 5000. Desired error: 0.0099999998.
Epochs 1. Current error: 0.2485879362. Bit fail 80.
Epochs 500. Current error: 0.0141996695. Bit fail 4.
Epochs 1000. Current error: 0.0120923920. Bit fail 1.

Epochs 1500. Current error: 0.0116548287. Bit fail 1.
Epochs 2000. Current error: 0.0118962619. Bit fail 2.
Epochs 2500. Current error: 0.0116990097. Bit fail 2.
Epochs 3000. Current error: 0.0111343693. Bit fail 2.
Epochs 3366. Current error: 0.0099999355. Bit fail 1.
Algorithm predicted class: [1]
Accuracy: 100.0% - test set of size 20.0%
The first lines are output from FANN training our network. As you can see the error generally decreased as the network is being trained which indicates our network and data architecture is solid. Next we see that we predicted admission ([1]) for a student with a exam 1 score 45 and an exam 2 score 85. Examining our plot this seems reasonable.
Lastly we can see the accuracy of our network on our testing data is 100%. This is much better than our logistic regression algorithm which achieved a 95% accuracy on the same data. This shows that Neural Networks are better at solving this specific problem than the logistic models we created.
The full source code for this example is available in the following GIT repository: https://github.com/daugaard/example-neural-network.
Thanks , Very Good