Implementing OCR using a Random Forest Classifier in Ruby
In this blog post I will show how to implement OCR (optical character recognition) using a Random Forest classifier in Ruby. As our dataset we will be using the MNIST database of handwritten digits and for our Random Forest implementation we will be using Python’s sci-kit learn library. This post also shows how easy it is to integrate the plethora of data science tools from Python into Ruby applications.
The complete source code can be found here.
Dataset
For our dataset we are going to use the MNIST database of handwritten digits. The MNIST database of handwritten digits is a subset of the larger database of handwritten digits from the national institute of standards and technology. This subset has been size-normalized and centered in a fixed size image enabling us to use the data directly without any preprocessing.
The dataset contain 60000 single digit images for training our algorithm, and 10000 single digit images for testing so it is a substantial dataset.
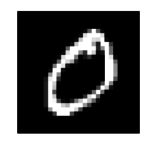
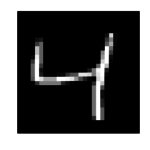
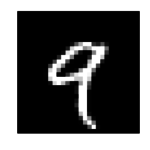
The images comes as 28×28 pixel grey-scale images, a few examples are show below.
The Random Forest algorithm
The Random Forest algorithm is an ensemble learning method that can be used for both regression and classification machine learning problems. It works by building a multitude of decision trees during training, and then using a combined output of these trees to determine the output during a prediction. The Random Forest algorithm has a number of advantages such as immunity to noisy datasets, unimportant features and mislabeled input data.
Setting up a Random Forest classifier in Ruby
Unfortunately there are not a lot of general purpose Random Forest implementations available in Ruby. However fortunately there is a lot of implementations available in Python, and using PyCall we can now integrate seamlessly to Python libraries in Ruby.
First step of our implementation will be setting up Python and installing scikit learn. If you don’t already have it setup you can follow the instructions in Using the scikit-learn machine learning library in Ruby using PyCall to get this configured.
Next we install the PyCall gem in our Ruby environment with:
$ gem install pycall
We then create our Ruby file and start by requiring PyCall and a DatasetReader class I’ve created to help read the IDX image data files.
require 'pycall/import'
require './dataset_reader.rb'
We then import the RandomForestClassifier from scikit learn using PyCall:
include PyCall::Import
pyfrom :'sklearn.ensemble', import: :RandomForestClassifier
Next we need to read the dataset into Ruby. For that we use the DatasetReader static class. The DatasetReader class implements two methods: read_labels and read_images, these methods will read IDX files and return Ruby arrays.
You can download the dataset_reader.rb file here.
We load the datasets as follows:
test_labels = DatasetReader.read_labels( "data/t10k-labels.idx1-ubyte" )
test_images = DatasetReader.read_images( "data/t10k-images.idx3-ubyte" )
rows, columns = DatasetReader.read_rows_columns( "data/t10k-images.idx3-ubyte" )

puts "Labels: #{test_labels.size}, Images: #{test_images.size}, Rows: #{rows}, Columns: #{columns}"

train_labels = DatasetReader.read_labels( "data/train-labels.idx1-ubyte" )
train_images = DatasetReader.read_images( "data/train-images.idx3-ubyte" )

puts "Labels: #{train_labels.size}, Images: #{train_images.size}"
With our dataset loaded we can now setup our machine learning model and fit it to the training data:
# Initialize a RandomForestClassifier
clf = RandomForestClassifier.new()

# Fit with training data
clf.fit(train_images, train_labels)
Having our classifier trained we can then try it out on our test data and calculate the classification score:
# Score our fit using the test data
classification_score = clf.score(test_images,test_labels)
puts "Prediction score for Random Forest classifier #{(classification_score*100).round(2)}%"
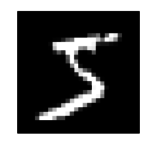
Lastly we can also run single predictions on the test data. In this example we output the predicted class for test sample 8, as well as the probabilities of being in any of the 10 classes (0,1,2,3,4,5,6,7,8,9) and the actual label (class).
# Do a prediction for one sample
sample = 8
puts clf.predict([test_images[sample]])
puts clf.predict_proba([test_images[sample]])
puts "Correct label: #{test_labels[sample]}"
The full source code is available in this repository.
Executing our Ruby script gives us the following output:
Labels: 10000, Images: 10000, Rows: 28, Columns: 28
Labels: 60000, Images: 60000
Prediction score for Random Forest classifier 95.06%
[5]
[[ 0. 0. 0.2 0. 0.2 0.6 0. 0. 0. 0. ]]
Correct label: 5
This shows that with using default parameters for the scikit learn Random Forest implementation, we can teach it to classify 95.06% of the test images correctly.
It also shows that test sample 8 is predicted to be a 5, with 60% probability of being 5, 20% of being 4 and 20% of being 3. The correct label was 5.
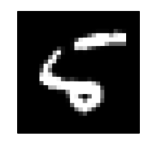
Test sample 8 is shown here on the left. As you can see it looks like a 5 but is definitely not an easy digit to classify.
This tutorial illustrated how to setup a Random Forest classifier in Ruby using PyCall and the scikit learn library. This shows us how we can harness the machine learning tools from Python seamlessly in Ruby, when there is no Ruby library available for the task at hand.
Great job! Soren, keep on.
Excellent Work.Very much useful.Keep going……….